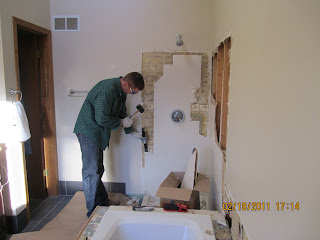
The fist step in this project was demoing the original tile, shower glass, and shower base. Everything came out real easily, however I was really careful not to hit any pipes. Here are some demo photos:
After demo was complete I installed a new sheet o plywood over the OSB board. Next I installed a new floor drain and 2x8s between the studs to create a place to staple the shower liner to. I was able to add an additional 4SF of space onto the shower by extending the base to come flush with the tub frame. To keep water from exiting the shower I also built a curb out of 2x4s. Here are some pics:
During this time I also hired a plumber to install a new shower valve and extend the shower head outlet to accommodate a rain shower head. The plumber had the valve and copper pipe installed in about an hour at a cost of $110. I pretty much watched over his shoulder to learn as much as I could; so maybe next time I can do it myself. The next step was to install the shower liner. After the liner was stapled to the 2x8s I began installing 1/2" cement board on the walls.
After all the cement board was installed I placed fiber tape on every joint then applied mortar over the taped joints. I also placed about 1 inch of base mortar on top of the shower liner. After waiting 24hrs for the mortar to cure, I installed a layer of mesh wire and then finally placed another 1 inch of base mortar on top of the mesh. This mesh provided extra compressive strength to the base.
Before I could start laying tile, I built 12" x 12" niche in the wall for shampoo/soap storage. The niche fit perfectly between the existing studs.
Tile: I wanted to match the shower base tile with the floor tile so I chose a charcoal color. I love the look of travertine so I stuck with soft tan and beige colors for the wall and tub surround. I really like the the base pops against the lighter wall tile. I bought all our shower/tub tile from Floor and Decor outlet and Lowes. Shower wall tile was 6"x12" travertine, base 2"x2" porcelain, 4" travertine mosaic boarder, and the tub 1"x2" travertine. Unfortunately I do not have many pictures of the tile install:
After completing the tile, I installed the shower head and valve hardware. We went with a combination from Delta faucet. We also installed a new brushed nickel tub faucet from Home Depot to match the vanity faucets.
The last step in the renovation was the shower glass. After searching around and negotiating with various glass installers we ended up with 1/2" seamless glass. To match everything else in the bathroom we chose brushed nickel hardware and a matching ladder handle. I think in the end the bathroom turned out great. I want to thank Kim for being patient with me and showering in the guest bath for weeks!! Here are the final results: Thanks for reading!!


Looks great babe! Don't forget to write about the wall and pocket door :)
ReplyDeleteLooks great Keith! Do you find that 12x12 is enough for all Kim's bath products? I guess with the extra 4SF you have room for a little corner shelf if you need it!
ReplyDelete